Monday 31 October 2011

Happy Halloween!


Thanks everyone for hanging in there while a had quite a long blogging break! Will be back shortly with some crochet and Christmas decoration shenanigans!

XxX


Friday 22 July 2011

Sunshine broadcast collection giveaway on Lilibeestudio!!


It's Sunshine Broadcast Giveaway time on LilibeeStudio today!You have until july 31 to play and win Sassafras Sunshine broadcast six 12 / 12 double sided papers , sweet treat stickers, journal tag stickers, flag banners stickers , alpha stickers , new Die Cut Foldies and other surprise goodies!!
 
 Pop over to LilibeeStudio to find out how to play along! 

XxX

Wednesday 13 July 2011

Taking A Little Time

I'm finding the daily pace of life a tad busy at the moment, there's a few reasons, bigger house = more house work : ( , a garden rather than just grass = weeding and tiding, two young boys = constant running around like a mentalist, and work on my handmade Christmas has begun! Blogger has also been putting me off  blogging too with it's stupid picture uploading. I've been thinking about using Flickr more for blogging, and just using one photo per post to try and make it less time consuming, for now at least. So for now blogging will be a bit intermittent as I try and  find the right balance. I have put a link to Facebook on my side bar  for those of you that may be interested, and I often upload my photos onto Flickr.

Wishing Tree @ Nunnington Hall 7/7/11
The Wishing Tree at Nunnington Hall


In other news, Dylan turned three in June and Leon has just celebrated his first Birthday.  Dylan will be starting Nursery school in September at the local primary school, which we are all very excited about. We had a quick visit and play time there yesterday which he loved. We've also been on quite a few days out, you can see the photos on Flickr if you wish!


Well, thanks for stopping by!

XxX

Tuesday 31 May 2011

May...Where Did You Go?

Well, May has been a very busy, but enjoyable month. We've been settling into our new home, Tony's had some time off work, I've had my 32nd birthday, some happy mail from my friend in Canada and the kids have been poorly. It's been crazy, but mostly fun.

I was kindly given some money for my birthday from some of my family, so I put it to good use and bought a Family National Trust Membership Card for us all. We've already had our moneys worth out of it and we've only had it for three and a half weeks.


Beningbrough Hall
Leon on a swing at Beningbrough Hall


Aldborough
It's either this, or the naughty step. The stocks Aldborough.


Newby Hall 08/05/11
Newby Hall


Newby Hall 08/05/11
Newby Hall has the nicest gardens, but isn't a National Trust site.


Happy Mail From Canada
A surprise birthday card and gift from my friend in Canada


So that's May in a nut shell. There are more photos on Flickr, for those of you that like all the pics, like I do. If you do go over to Flickr, you'll also see I've been busy with a couple of ReStyle projects that I haven't blogged yet. I'll hopefully get round to that this week.

I'll try not to leave it so long till the next time! : )

XxX


Monday 2 May 2011

We're In...

 but out most of the time because the weather has been absolutely spectacular over the past couple of weeks. Two bank holiday weekends in a row with super weather are something to behold! So we've been having a bbq here and there, going for walks and exploring our new town and surrounding villages. There are some lovely walks to go on, especially near the river and canal.

Leon took his first couple of steps without holding on to anything this weekend. : )


The River Ure

Dylan

Windswept Dylan

The canal

Leon eating his crisps
Tony and Dylan miles ahead


 The house move itself went fairly well. We had a few problems on the day though, the van we hired broke down. Thankfully our friends had a relative with a pick-up truck we could borrow, so all was well in the end.  Thank you Simon and Emma, you  saved the day! Most of the unpacking is done, it's just my craft area that needs sorting now. I'll be back soon with some more pics (i forgot to take my camera when we went for a walk into town). There's a beautiful little green grocers shop in the town centre. I'm so happy we moved here, I feel like I'm on holiday at the moment.


See you soon!
XxX


Saturday 9 April 2011

Moving House!

Hello!  Just the other week, our landlord let us know that he unfortunately has to sell the house we live in. So at the moment we are up to our eyeballs in paper work and packing. We have found somewhere new to live and are just waiting for the application to go through. Fingers crossed we should be moving into our new home on the 22nd. I'm actually really excited about it! We're moving further into the countryside, which is just my thing. So I'll be taking a couple of weeks off from blogging, just until we get sorted.

See you soon, and I hope everyone has a lovely Easter break!

XxX


Friday 1 April 2011

A Little Bit Of Sass!

Here's a layout I'd like to share with you, that I made for the Sassafras March blog challenge, which had to include the technique of Blocking. Not the same as crochet blocking, it just means to create a square or rectangular shape on your layout using photos and/or paper. The photo on this page is of Dylan this time last year, I can't believe how much he's grown up.


Looking Back-Layout Using Blocking


All of the items used to create this layout (except the thread and foam pads) are from Sassafras. You can see the list of papers on my Flickr account. 

Also I just wanted to say a big thank you to my new followers and my old ones actually, thanks for coming here to read my rambles! It does mean an awful lot to me, having you all here. :) 

Oh and just one more thing, you may have noticed that I've been messing about with my blog design and fonts. I'd really appreciate some feedback on it please. Is it loading up quick enough for your liking and is the new font clear enough to read? Please let me know if it's causing problems. 

Thanks again!

XxX


Wednesday 23 March 2011

Kyla Mod Stroller Blanket

I've been quite busy doing a lot of crochet these past couple of weeks. I've made a blanket for Leon, for when he goes into his own bedroom. The pattern is from Baby Blueprint Crochet by Robyn Chachula. This has been one of my most challenging crochet projects so far. I found it quite difficult to get the tension right on some of the lattice stitch blocks. I have a habit of  making my chains quite loose, this is useful for foundation chains, but not so good for part of a stitch pattern. I'm hoping that a bit of blocking might help. I did consider frogging it, just so I could redo those small blocks, but my craft time is limited at the moment and I've got too many other projects waiting in the wings. I'm quite happy to just move on and learn from my mistakes! Really, I am! :) I used Debbie Bliss Pure Cotton Aran for this, that I already had in my stash. I bought quite a bit of it in a sale a while back for £0.99 & £1.99 a ball, bargain! It's discontinued now though, which is a shame because it's so lovely and soft .


Kyla Mod Stroller Blanket


Sorry about this photo, it's a bit crappy!

I used colours that I thought would match the colour scheme I've chosen for his room. I've also snagged another bargain, which was this gorgeous fabric that I'm going to use for his bed quilt. I've chosen a theme that's not too babyish so that it will last a good while.


I'll let you know if the blocking works! 
XxX

Tuesday 22 March 2011

Project Re-Style - Yoga Waistband skirt

Here's my first attempt at sewing jersey fabric, and what a performance I've had with my sewing machine. It's been skipping stitches and all sorts of stuff. I had to walk away from it for a few days and then come back to it with  a clear head. Now it seems ok! Maybe it was my tension that needed adjusting and not the sewing machines?  I made this skirt with a blue maternity top and a slightly short vest. I've always had a problem with vests being too short after a couple of washes (I'm nearly 5'8") and have just recently discovered that if I buy tops for tall people I don't have this problem. Genius!!! Anyway, back to the ReStyle.  So I cut off the straps and the frill edging from around the top and straightened up the edge a bit, where it was shaped for boobs. Then I cut the brown vest in half, and used the bottom half of the vest. I turned the skirt inside out and left the vest the right way around. I hope you're still with me here. Then I made a loose row of stitches around the top of the blue part and gathered it together, until it was the same width as the brown piece. Then I pinned the two cut edges of both pieces together so that the original hem of the brown vest became the bottom of the yoga waist band and sewed them together using zig zag stitch. Now the skirt has an adjustable yoga waist band. There's a couple of good tutorials on the internet for this as well if you fancied making one.

Before
S6005556


After
Yoga waist band skirt
  It looks better on than off! :)

Thanks for popping in again! 

XxX

Monday 21 March 2011

Thank You!

Just recently I did a little swap with my blog friend Julie from Canada. Who's a super fantastic card maker and a talented scrapbooker! I made some little crochet hearts for Julie and some hair clips  for her two beautiful girls. And Julie sent me some lovely handmade flowers some alphabet stickers and paper pieces from Rose Moka. Be sure to pop over to Julie's blog and  say Hi!, there's some great inspiration there.


Thanks once again Julie. I love happy mail, I'm looking forward to some more swapping in the future! :)

XxX

Friday 25 February 2011

Project ReStyle - Accidentally Felted Jumper

Hello! I never really know what to say at the start of a blog post... Anyway, here we go! :) I'm on a bit of a make do and mend mission this year. For a number of reasons really, like trying to be more aware of waste, trying not to spend money if we don't really need to, to save money for our wedding, and I get to do more projects but with free stuff! It's a win win situation really. A few people have inspired me into doing this, Claire, Elsie, Emily, Kara, Rachel. There's some great inspiration on all of these blogs.

My first project was with an accidentally felted jumper of Dylan's. He wasn't too bothered when I  shrunk it, he only wore it twice because it was too itchy. So that was a plus, he's quite touchy about his clothes and such. I've used too pieces from the hood to patch a pair of his holey jeans and two larger pieces to make him a pencil case. I haven't had chance to take a photo of the jeans yet, as he wanted to wear them straight away and now they're in the wash. But here's a photo of the pencil case. He was really pleased with it, and so was I. I feel the need to make one for myself now.


Project Restyle - Accidentally Felted Jumper and a Pair of Holey Jeans


Project Restyle - Felted Jumper Pencil Case


I'm also working on another mini album at the moment, here's a sneaky peek of it.


Water Fun Mini Album Cover


I started this before Christmas but got side tracked with finishing off gifts and cards! I'm very easily distracted! In fact I've got quite a few  projects on the go at the moment. So I'd better get off the internet and get some work done!

See you soon!

XxX

Sunday 13 February 2011

Valentines Mini Album

Good morning all! Here's a little mini album I made this week, using some of my supplies from a new scrapbooking kit club that I've subscribed to called Quirky Kits. I have used some of my own stash too, I like to mix things up a bit. I also used some journaling cards from Elle's studio, that I won on her blog a couple of weeks ago. :)


My Heart Mini Album collage
 You can find more photos of this album on  Flickr 


Most of the papers used in this album are Sassafras Paper crush which came in my kit, but I also used some of their Count Me In and Cherry Delicious papers and a mixture of Sassafras Sweet Treats and Blossoms stickers. The heart shaped album is from Maya Road.

Happy Valentines Day For Monday! Hope you all enjoy the rest of your weekend! 

XxX

Monday 31 January 2011

Trying To Be More Organized

Good Morning!

I've got a few photos to share with you, of a project I'm working on at the moment and it's not crochet! I'm making a craft planner to try and organize my time a little better. I was inspired to make it by one of Lilibee's lovely classes and a planner kit, that I wish I'd bought when it was out! The folder is upcycled, it was a guide to money for new parents, given to me by my midwife.


To decorate the planner I used papers and embellishments from Sassafras-Sunshine Lollipop, Prima-Rebellious, American Crafts-Craft Fair and Blue Skies, Cosmo Cricket-Nutmeg. I've also used Red Velvet Art Paper Dolls, embroidery patterns and some black and white colouring book illustrations which came free with the RVA Small Craft Class that I took last year.


 To make the page tabs, I downloaded and printed off some free fonts from dafont.com, onto printable acetate. Since taking this photo I have changed it a little bit and double up on the months, because the planner was filling up too fast and it only had dividers in it!


More to come soon!
XxX


Sunday 30 January 2011

My First Blog Award

I've noticed a few new faces here, so thank you all very much for reading my blog. I can't explain how much it means to me when I see someone has left me a comment or has started following my blog.

The other day I received my first blog award from Jo, thank you so much! It came as a total surprise. I have decided though not to post these awards on my side bar. I will however tell you seven facts about myself, because there are a couple of things I've nearly mentioned before but then just not been able to.

1. I'm a fair weather person  and get quite depressed if there's no sunshine, although I do really love it when it snows.

2.  I was hit by a car when I was 11 years old and it's left me too nervous to drive.

3. I can touch my nose with my tongue. My party trick!

4. My dad took his own life on 14th December 1999. I've never mentioned it on my blog before because I still find it hard to talk about. And I like to keep my blog a happy place, so I'll probably never mention it again.

5.  Ben and Holly's Little Kingdom is actually one of my favourite programmes, not just something I have to watch because Dylan likes it! :)

6. I've got just about every set of pencils that Derwent have ever released, and I like to keep all the pencils inside in rainbow order. Dylan also has this habit and he's only 2 1/2!

7. I've got a terrible memory and have to write lists for everything.  And then hope I can remember where I've put the list!


So, now you all know I'm a bit crazy!

XxX


Sunday 9 January 2011

Crochet Dinosaur Hat


Crochet Dinosaur Hat
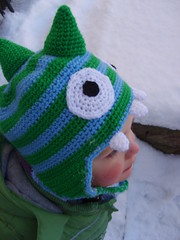
Originally uploaded by FizzPopBang


Hi here's a free pattern I've made to share with you. It's for a dinosaur hat that I made for Dylan. He's 2 1/2 years old, but he's quite large for his age. I made the hat fairly big though, so I think it would fit a child up to the age of about 5. You could adjust the size of the hat by using a different weight yarn or size crochet hook. You could also make more or less of the increase rows to change the width and adjust the length by changing how many none increasing rounds you make. Hope that makes sense? This is my first time at writing a pattern, so there may be mistakes in it, if there are, feel free to correct them in the comments section. :)


The hat is made in continuous rounds, do not join the rounds, mark the first stitch of each round to make it easier to keep count. When making a colour change do not break off the yarn, leave it attached and carry the colour not in use on the wrong side of the hat until it's needed again. Crochet through both loops through out the pattern. This pattern is written in US terms.


st = stitch

sts = stitches

ch = chain

sc = single crochet (UK double crochet)

hdc = half double crochet (UK half treble crochet)

hdc2tog = half double crochet 2 together (decrease) (UK half treble 2 together)

hdc3tog = half double crochet 3 together (decrease) (UK half treble 3 together)


Hat - Make 1 (I used Green and Blue Woolcraft Acrylic New Fashion DK and a size 5mm hook)

Round 1 - Make a magic ring for 6sc using green = 6sts

Round 2 - 2sc in each st = 12sts

Round 3 - 2sc in next st, 1sc in next st, 6x = 18sts

Round 4 - 2sc in next st, sc in next 2 sts, 6x = 24sts change to blue

Round 5 - 2sc in next st, sc in next 3 sts, 6x = 30sts

Round 6 - 2sc in next st, sc in next 4 sts, 6x = 36sts

Round 7 - 2sc in next st, sc in next 5 sts, 6x = 42sts change to green

Round 8 - 2sc in next st, sc in next 6 sts, 6x = 48sts

Round 9 - 2sc in next st, sc in next 7 sts, 6x = 54sts

Round 10 - 2sc in next st, sc in next 8 sts, 6x = 60sts change to blue

Round 11 - 2sc in next st, sc in next 9 sts, 6x = 66sts

Round 12 - 2sc in next st, sc in next 10 sts, 6x = 72sts

Round 13 - 2sc in next st, sc in next 11 sts, 6x = 78sts change to green

Round 14 - 2sc in next st, sc in next 12sts, 6x = 84sts (continue to change colour at the end of each 3rd row)

Round 15-34 - Sc in each st around = 84sts


Earflaps - Make 2, 1 on each side. Green Yarn

Hold the hat with the rim facing upwards right side facing out. Keep the colour change area to the back. Mark the centre of the front of the hat with a safety pin, count 17 stitches around to the side pull the yarn through and attach with a slip knot.

Row 1 - Ch 2 hdc 13 = 13 sts

Row 2 - Ch 2 turn, hdc2tog, hdc in next 9 sts, hdc2tog = 11sts

Row 3 - Ch 2 turn, hdc2tog, hdc in next 7 sts, hdc2tog = 9sts

Row 4 - Ch 2 turn, hdc2tog, hdc in next 5 sts, hdc2tog = 7sts

Row 5 - Ch 2 turn, hdc2tog, hdc in next 3 sts, hdc2tog = 5sts

Row 6 - Ch 2 turn, hdc2tog, hdc in next st, hdc2tog = 3sts

Row 7 - Ch 2 turn hdc3tog = 1st


Sc evenly around the edge of the hat and earflaps starting from the back of the hat.


Braids - Make 2

Take about 60cm of yarn in green and blue, I used 3 of each colour. Use a large yarn needle and draw the yarn through the point of the earflap. Now braid together. Leave about 8cm at the bottom unbraided, knot to make the tassel.


Horns - Make 4, green

Round 1 - Make a magic ring with 4 sc

Round 2 - 2sc in next st, sc in next st, 2x = 6sts

Round 3 - 2sc in next st, sc in next 2 sts, 2x = 8sts

Round 4 - 2sc in next st, sc in next 3sts, 2x = 10sts

Round 5 - 2sc in next st, sc in next 4 sts, 2x = 12sts

Round 6 - 2sc in next st, sc in next 5 sts, 2x = 14sts

Round 7 - 2sc in next st, sc in next 6 sts, 2x = 16sts

Round 8 - 2sc in next st, sc in next 7 sts, 2x = 18sts

Round 9 - 2sc in next st, sc in next 8 sts, 2x = 20sts

Round 10 - 2sc in next st, sc in next 9 sts, 2x = 22sts

Round 11 - 2sc in next st, sc in next 10 sts, 2x = 24sts

Round 12 - 2sc in next st, sc in next 11 sts, 2x = 26sts

Fasten off leaving a long end for sewing.

Stuff lightly with polyfill and stitch to the hat.


Eyes - Make 2, white

Round 1 - Magic ring with 6sc = 6sts

Round 2 - 2sc in st = 12sts

Round 3 - 2sc in next st, sc in next st, 6x = 18st

Round 4 - 2sc in next st, sc in next 2 sts, 6x = 24sts

Round 5 - 2sc in next st, sc in next 3 sts, 6x = 30sts

Round 6 - 2sc in next st, sc in next 4 sts, 6x = 36sts

Fasten off leave a long tail for sewing to hat.


Eye - Make 2, black

Round 1 - Magic ring with 6sc = 6sts

Round 2 - 2sc in each st around = 12sts

Fasten off leaving a long end, stitch to the white of the eye. I stitched mine on wonky for a googly eyed dinosaur! :) Stitch the completed eyes on to the hat.


Teeth - Make 4, white

Round 1 - Magic ring or 3scs = 3sts

Round 2 - 2scs in each st = 6sts

Round 3 - sc in each st = 6sts

Round 4 sc in each st = 6sts

Fasten off leave a long end for sewing, stitch to front edge of hat.

And your done! Enjoy!

There are more photos of this hat on my Flickr account if you'd like to see them.


PS. I am happy for you to sell items made from this pattern but please do not claim the original  pattern as your own. If you post photos of the hat you have made on your blog/website, please link back to this page.

Added - This hat measures approx 20 inches circumference. 

Many Thanks.

XxX

Saturday 1 January 2011